SKIP AHEAD TO
Add / remove users
Add / change credit card information
Add custom fields
What are tags and how to use them
Change and save view preferences
Percentages and steps in sales process
Import contacts, accounts, or opportunities
Export records
Connect email to CRM account
Automate sales process workflows to automatically create to-dos
Migrate entities to a new sales person
1. How do I add/remove users from my account?
Click the Organization Settings icon.
Click Billing and ensure that your subscription has the correct number of licenses.
If needed, adjust the number of licenses.
Click Users.Click the + button on the top right of the Users menu
Enter required informationSelect whether to license the user for access (failure to do so will result in their not being able to access the system after the trial period is
complete.)
Click Create … we’ll take it from there and send them an invitation to your CRM and verify their email.
2. How do I add/change my credit card information?
Click the Organization Settings icon.
Click Billing
Click Subscribe
The new credit card subscription page will open, please enter your credit card information and click “Subscribe”
You will be taken back to CRM and your licence will be active!
3. How do I add custom fields?
There are two ways…
The easiest way is to, when in the Contacts, Accounts, or Opportunities pages, click the purple +Custom Field to the upper right of your screen next to the last field present in your current view.
![]()
The slightly more complicated way is to Click the Organization icon
Click Custom Fields
You can edit/add/delete all of your custom fields from this menu.
4. What are tags and how do I use them?
Tags are meant to be used and messed around with often.
They are meant to help provide context and organization to your records.
You can easily add Tags by clicking the grey “Tag” icon anywhere you see it.
A Tag should be an identifier for a loose group of records (for example: “Warm Lead” or “Met at Trade Show” might all be good Tags)
You can then use those Tags in searches to find records, or to filter in a View or Export.
And don’t be afraid to use Tags for very temporary cases, you can easily delete them from the Tags menu at any time.
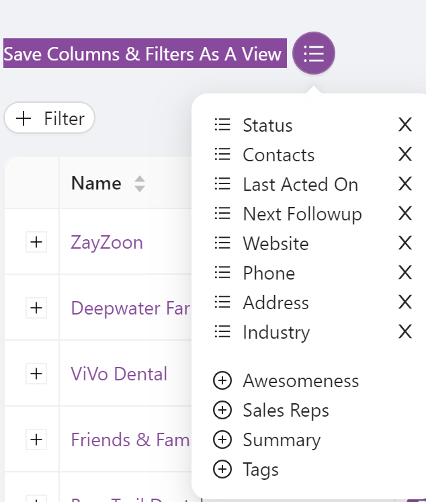
5. How do I change and save my view preferences?
From either the Contacts, Accounts or Opportunities pages click the icon next to the purple text that reads: “Save Columns & Filters As A View”
Select the fields you want in your view by clicking the ‘+’ buttons to the left or the X on the right, place them in the order you would like by dragging the hamburger icons.
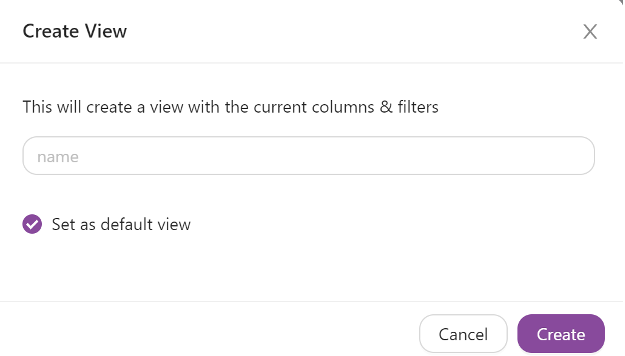
Lastly, click the Text “Save Columns & Filters As A View” and enter the name for your view.
Choose whether you’d like it to be set as the default (the one that shows automatically) view for that entity (either Opportunity, Account, or Contact)
Hit ‘Create”
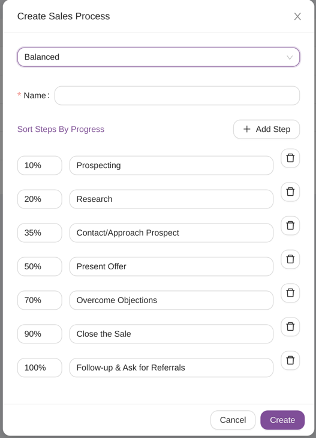
6. What is the deal with the percentages and steps in setting up a sales process?
Well, in Evolved Metrics CRM, we want to make your sales process simpler. So we encourage users to set up a sales process and to track the elements of their “stages” of talking to customers. And by assigning percentages to those stages, you can make forecasting easy as the system automatically applies that percentage to the expected revenue from that opportunity and add it to your forecast on the dashboard. The percentages in your sales process should roughly correspond to the likelihood of that sale closing.
Don’t worry, if you just want to get started, you can select a templated process from the top of the sales process creation menu. There are simple, balanced, and detailed versions available to try and experiment with. And if you’re an experienced sales guru, go ahead and customize the process steps and percentages as needed. You can have unlimited sales processes for your company and you can also link them to products so that particular products always use their specific sales process, or you can mandate one process across your entire company.
7. How do I import contacts, accounts, or opportunities?
For each of these, the process is basically identical. While in the menu for the entity you are looking to import into (e.g. contacts) just click the import icon

From there, you will see a pop-up asking you to download a template:
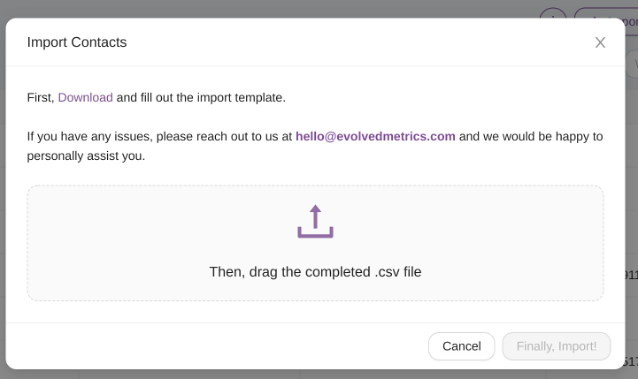
Once you’ve downloaded the template, open it in Excel or Google Docs and paste any data from any existing spreadsheet into the template – remember, if you have the need for custom fields, you should create them before you download the template. Once loaded up with your data, drag the completed csv into the same menu you downloaded the template from and click “Finally, Import!”
You’re all done!
8. How do I export records?
First, please note that the View selected control what data you will receive in your export for all three entities. A good general rule is that what you see on the screen, in terms of columns, is what you’ll get from an export.
So ensure that the right custom saved view or custom columns are selected.
Click the export button.
![]()
Your CSV file will start to download.
9. How do I connect my email to my CRM account?
Click the Profile icon (the outline of a person image in the top right corner of the app)
Click “Profile”
Click “Connect” under Sign in to integrate your email with CRM
Input your email address in the entry box that appears.
You will be prompted by either Google or Microsoft to authenticate and approve “Nylas” for your emails. Don’t worry, Nylas is our email integration partner, please enter your password and follow the instructions.
When complete, you’ll be returned to your profile screen and email sent to and from your (meaning you are the assigned Sales Rep in CRM) contacts under all entities will sync up and show in all screens related to those records.
It may take several minutes for the sync to complete.
10. How do I automate my sales process workflows to automatically create to-do’s related to my workflow?
First, go to the Sales Process menu on the left panel. Open the process you wish to add automation to.
You can add automation steps by clicking on the “Update Question” link.
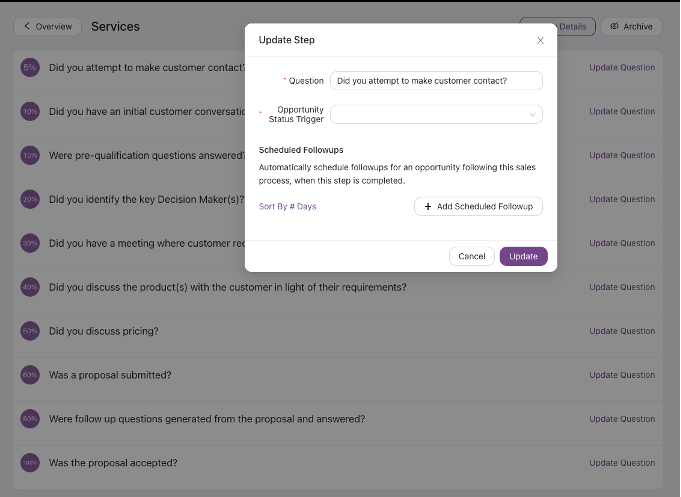
You can either trigger the automation based upon the completion of the process step/question or via your customized Opportunity Status change.
Next, click on “+Add Scheduled Followup”
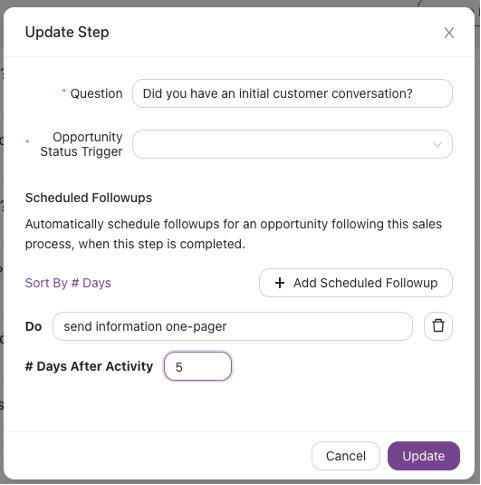
Complete the automated task name by filling out the “Do ____________” item and let the system know how many days you want it to wait before creating the additional to-do item.
Hit “Update” and your to-do will now be automatically added on your list X days after your salesperson complete that sales process step.
11. How do I migrate entities to a new sales person?
Navigate to the Organization menu and the Users sub-tab.
Click on the three dots menu item in the top right corner and click “Merge Users”.
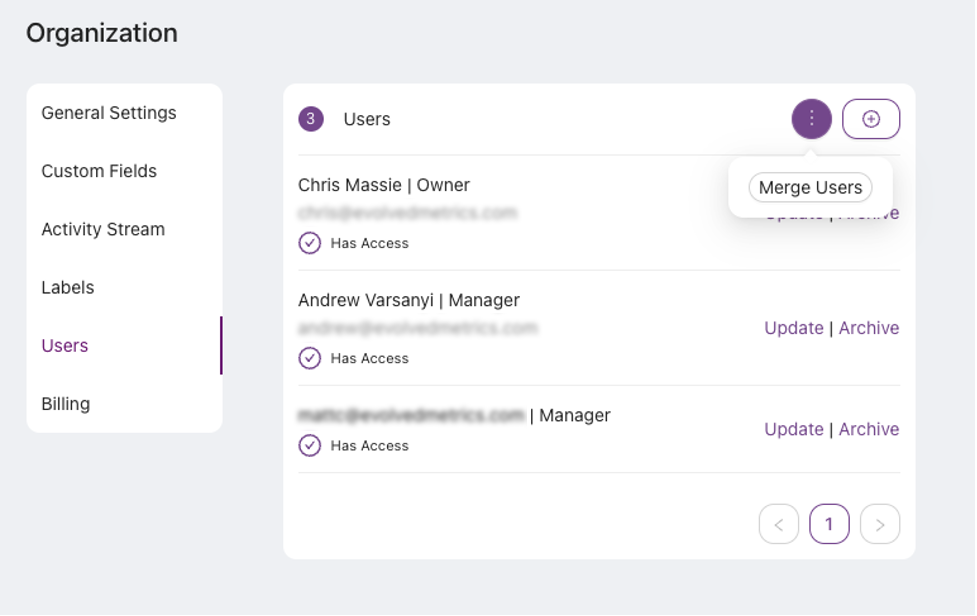
Merge your old user with a new user and all tasks, opportunities, contacts, and other data will become available and the responsibility of the new user.